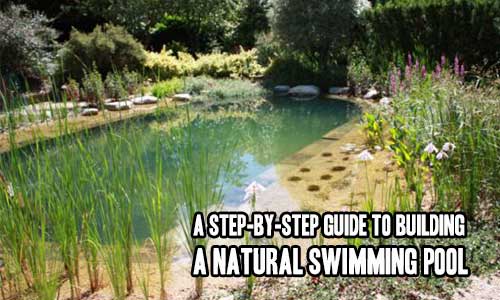
A Step-By-Step Guide to Building a Natural Swimming Pool

Solid Options
If you desire a concrete pool liner, they do have their perks. Concrete or block sealing systems still reduce energy and chemical usage by allowing for the natural filtration system in your pool. To pour a pool, you need to have the proper density and mix of concrete to prevent cracking. This is not a process I’d recommend for someone not familiar with the ins and outs of concrete work, but if you are, it’s recommended to use a 4-1 mix of Portland cement and sand. After the ground is compacted and covered and concrete is poured, the pool will need a coat of stucco waterproofing, as concrete itself will absorb water.
Another option to concrete is blocks of recycled polystyrene and cement called Rastra block. Rastra blocks come in 10 feet sections that are 10 or 14 inches thick and 15 or 30 inches high. Don’t be fooled by the size of these blocks, they are extremely light compared to cement and can easily be handled by 2 people.
To build a block pool, you need to dig a hole slightly bigger than your pool’s dimensions to allow workspace. For the bottom, you can either pour a concrete slab or use a rubber liner, and then cover it with gravel. Be sure a proper drain and backflow preventer are installed. Lay one section of Rastra block on the edge of the concrete slab, and secure the block to the pad with rebar. The holes in Rastra block should be filled with concrete, which will flow between blocks and bind them together. Expanding foam sealant is used between joints and courses of block to help keep them in place. From there it’s recommended to trowel on 2 coats of stucco for waterproofing. Once built, the pool can be backfilled up to the Rastra block. The perimeter of the sidewalls can be nicely capped off with stones or plants growing up to the edge of the blocks.
Prep For Plants
Congratulations! You have built a pool at this point! But we’re not ready to break out the floaties and flippers just yet. Once construction is done, it’s time to complete your filtration area. To do this, add 3-6 inches of soil to the areas where your aquatic plants will be. Be sure to pick a soil that is clean and free of organic matter or animal excrement. Laboratory soil tests can help protect you from potentially harmful bacteria. Your state health department should be able to put you in touch with a lab in your area. Once your soil is in place and your pump and aeration hardware are installed, you can finally fill your new pool with water. Feel free to test your equipment at this point, but wait a week before planting your filtration system.
Pick Your Plants
 Obviously you’d like to have something exotic and brilliant in your new natural pool, but trust me, you’re much better off getting things suited to or native to your climate. Look up sources of local plant suppliers or visit your local home and garden store to find aquatic plants.
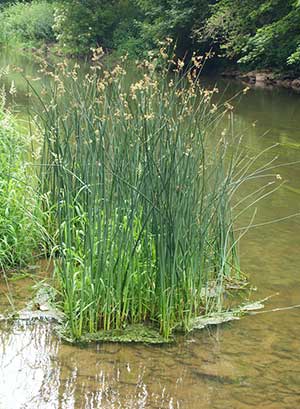
I personally have found that sedges and rushes thrive around the perimeter of natural pools. Arrowhead, pickerel weed, and water primroses should work well in the shallow areas. You can also use aquatic irises or cattails if you desire but know that these can run the risk of overcrowding other plants.
For the portion of your filtration area that’s 6-18 in depth, you’ll want to plant a mix of floating, submergent, and emergent plants. Submergent plants like common waterweed and hornwort are great choices due to their high oxygen output. Water lilies are great in any depth of this range, so don’t be stingy with those. Meanwhile, pondweeds and duckweed drift freely on the surface, so plant those if you’re looking for quick surface coverage. Plan ahead and group your plants by their type and size.
Algae Regulation
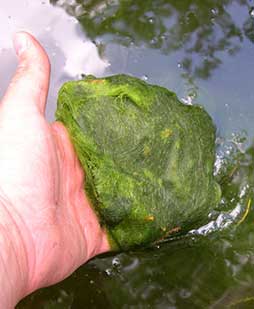 Algae can be a menace to your natural pool, as it is for pond owners around the world. Algae can smother other plant life by competing for sunlight and nutrients. Take heart that algae blooms decline quickly once water lilies and other plants grow and provide shade. You can further limit algae by trying to maintain a lower pH level of 5.5 to 6.5. The best way to control algae without damage to your delicate natural environment is to add more plants to beat out the algae for nutrients and light. You can also monitor your natural pool for phosphorous. Phosphorous levels can encourage algae growth, and are generally high due to fertilizer runoff and urine. You can limit these levels by taking measures to prevent runoff into the pool and also remind guests to use your restroom before they use your pool. It is also beneficial to aerate more if your phosphorous levels are out of line. Aeration and water movement will promote more natural filtering.
There are a number of home remedies and acids I’ve heard used to control algae, but in my experience, introducing foreign chemicals won’t likely help improve the quality of your pool. At this point your pool is a major investment, of your time, energy, money, and care. It is also a delicate ecosystem which won’t necessarily respond well to additives.
Maintenance
Natural pools are generally much easier to maintain than standard pools. One of the main things is to remove leaves and plant debris in the spring and fall. Other than that, keep the water level constant, and keep a few nutrient level test kids handy. Those kits are inexpensive and available in most garden centers.
Other than taking steps to maintain the ecosystem, the only other maintenance concern with a natural pool is the mechanical components. I recommend cleaning diffusers with vinegar and maintaining the integrity of your air hoses, connections, and pumps by inspecting monthly.
For more articles like this, remember to “LIKE” us on Facebook so you stay up-to-date.


No Responses