A Step-By-Step Guide to Building a Natural Swimming Pool
One of my favorite ways to spend a hot summer day is lounging around a pool. Whether you want enjoy a quick dip to cool off, or prefer to spend hours lounging on a raft, a pool can provide a wonderful way to combat the summer sun. But public pools can be crowded, noisy, and poorly maintained. What if I said you could build your own pool, with a small amount of materials and minimal chemicals? Sound too good to be true? I assure you it is not only possible, but practical. Where conventional pools can cost tens of thousands of dollars to have built, you can build a natural pool for as little as $2,000.00
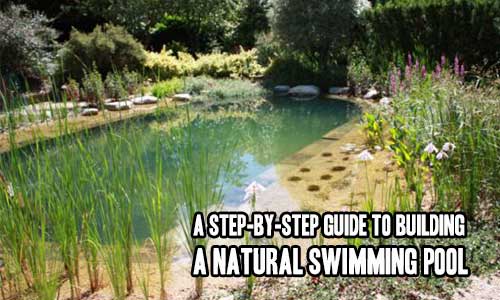
Rather than being concrete and mass-manufactured tile, a natural pool can be a beautiful edition to any landscape. By using gravel stone and clay instead of concrete, and natural aquatic plants in place of harsh chemicals, natural pools can not only be functional and fun, but also environmentally friendly.
Plot And Dig!
 Obviously, you will need a pit, so the first thing to do is decide where to begin excavation. You can dig your pool as shallow or deep as you want, provided you provide the right degree of slope for the sides. To prevent the soil of the sides from caving in, the proper slope ratio is one foot of vertical drop per three feet horizontal. By maintaining that ratio, any need for steel reinforcement of the sides is eliminated.
Plan Ahead For Filtration
To maintain water cleanliness and quality, reserve at least fifty percent of your pool’s surface area for aquatic plants. Your design can keep these plants off to one end or as a ring around the edge of your pool. The shallow-growing plants will replace a need for chlorine or expensive filtration and pump systems. As water passes through the plants fibrous roots, bacteria on the plants acts as a natural filter, removing toxins and excess minerals and nutrients from the water. Meanwhile, decomposer organisms around the plants effectively consume the excess bacteria, preventing waste buildup. As the plants tend to get a little slimy, you can keep the plants separate from the swimming area by making a simple rim at about one inch in depth along the plants will keep them in place while not interfering with water flow between the swimming and plant filtration areas.
The depth of the filtration areas should slope, and be a maximum of 18 inches along the swimming area. The outermost 6 inches should be 2-3 inches deep to allow taller plants to grow, where floating and submerged vegetation will fill the deeper end. These plant zones by being shallow will also help your pool by aiding in warming the water more quickly and also providing a habitat for frogs, dragonflies, and other aquatic creatures that will help control mosquitos around your pool.
Circulation
In order for your pool’s natural filtration system to adequately clean the water, it needs to circulate continuously through use of a pump. Water can be pumped through your filtration zone by using PVC tubing. The tubing should be buried in the soil about 18 inches deep. An aerator may also be used to insure that the oxygen levels are met for your backyard ecosystem. Underwater aerators, which diffuse air at the bottom of the pool use less energy and circulate water more effectively than say a constructed waterfall. You can actually build your own aerator by using a ¼ horsepower air compressor and high strength tubing connected to a diffuser to bubble air up through the water. The diffuser should be kept to the deepest point in the pool, as to avoid having it be damaged by swimmers or vice a versa. Your pool should be aerated for 4-8 hours per day broken up between morning and evening.
Another filtration option is a skimmer, which is hooked up to an additional pump. The skimmer is good for removing floating debris for your pool, which may be beneficial if nearby trees and shrubs are likely to litter your pool. If leaves may be a problem the main thing is to plan ahead to remove them before they sink and promote algae growth.
When it comes to installing pumps, compressors, and any other electrical equipment you will need to use extra caution. And do not run your power through extension cords, as the risks far outweigh the convenience. Instead hire a skilled electrician who can bury conduit for you and ensure the safety of you, your guests, and your filtration system.
Sealing the Pool
Once digging is complete for your pool and filtration zones, you have a few choices when it comes to making sure your pool will hold water. You can lay a synthetic liner or apply a layer of bentonite clay. Bentonite tends to be the cheaper way to go, averaging about 35 cents per square foot whereas liners can cost up to a dollar per square foot.
Bentonite clay is a binding agent, grabbing onto the soil particles and preventing pool water from leaking out into the ground. While some soils may allow you to simply compact the pool bottom, most do not contain enough clay to hold water. I’d recommend discussing options at this point with a local pond builder to get an expert opinion on which way to go given your region, soil type, and climate.
If bentonite will work in your area, compact the soil in your pool by using a lawn roller or compactor. From there, you need to spread a 2-3 inch layer of clay powder along the pool sides and bottom. Compact the clay with a tractor or compactor, then cover with a foot of topsoil and compact again. Your pool is one huge step closer to being usable!
If a synthetic liner is to be used, you’d be wise to spend the extra money on ethylene propylene diene monomer (EPDM) rather than PVC. EPDM has built in protection from UV rays and will remain pliable in cold weather. If your soil type has a lot of rocks or roots, I’d recommend at least a 45-60 millimeter liner, but if your soil is sandy and smooth you can get away with a 30 millimeter version. Once you have your liner, first compact the soil and cover it with a layer of sand or an absorbent material like old carpeting. Another good option is newspaper, as when it
gets wet it bonds well to the liner material, giving your pool a small extra degree of protection if a small tear forms in the liner during use.
Once the liner is in the pool, the bottom should be filled about 4-5 inches deep with clean gravel. This gravel layer will promote the growth of beneficial bacteria to help break down leaves and other biodegradable debris that finds its way to the bottom of your pool. Another step many people choose to add at this point is a pool entry system. A dock of some sort out to the swimming area or a set of stone steps will help protect the sides of your pool and give swimmers easier access.
So the pool bottom is now complete, and it is time to clean up the edges. First run a compactor around the perimeter of the pool to help limit soil erosion into the pool. You can also take preemptive measures to limit long-term shore erosion by adding a stone border or perhaps planting landscaping around the border. Plants hold the soil in place effectively while providing beautiful scenery around your swimming area. Just be sure to choose plants that will do well in a wet environment.


No Responses